Getting Here
This module is only accessible by Space Owners & Managers.
This module is accessed from the side navigation menu under the menu item Workflows.

The Workflows Module is a visual workflow builder used to automate processes. Workflows are flexible enough to incorporate elements like Contact data to build automation such as automated messaging, auto-assignment and more. A Workflow consists of a Trigger and one or more Steps.
Workflows Module
Use the 🔍 at the top of the Workflows Module to quickly find a Workflow
The main page of the Workflows Module is a listing page. It provides an overview of the Workflows in your Workspace.
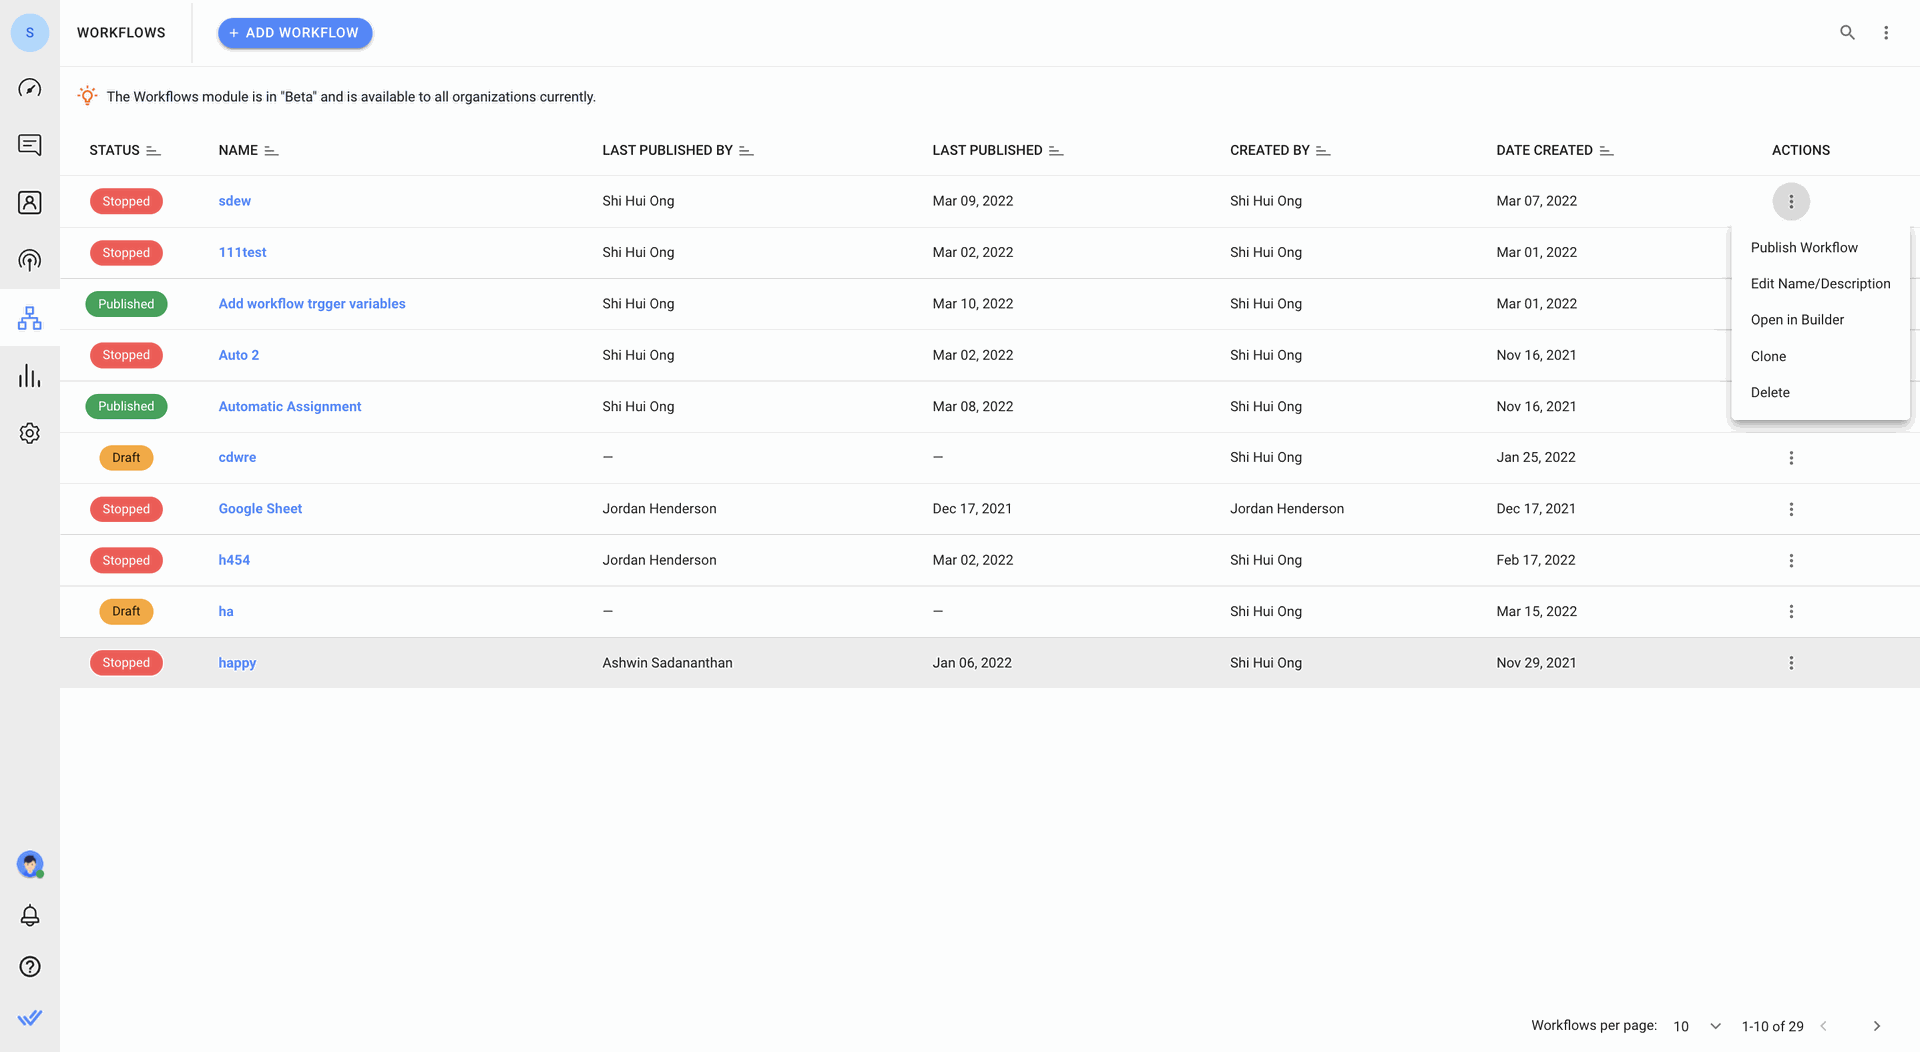
Below are the actions that can be performed in Workflows:
- Creating a new Workflow
- Saving a Workflow
- Publishing a Workflow
- Stopping a Workflow
- Editing a Workflow
Creating a Workflow
To create a Workflow:
1. Navigate to the Workflows main page
2. Click Add Workflow
3. Name the Workflow
4. Click Create
Once the Workflow has been created, it will open in the Workflow Builder. Start building the Workflow by selecting a Trigger.
Limitation:
Maximum 50 Workflows per Workspace.
Saving a Workflow
A Workflow can be saved by clicking the SAVE button in the Top Bar of the Workflow Builder.
Step configuration errors must be resolved before a Workflow can be saved.
Resolving Workflow Errors
If a Step in the Workflow is configured incorrectly, the ⚠ sign will appear in the Top Bar. Hover over the icon to see which Steps have configuration errors. Click on the Step in the dropdown list to identify it in the Workflow builder and open its settings in the Configuration Drawer.
Publishing a Workflow
To start a Workflow, you need to publish it. A Workflow can be published from two places:
- From the Actions Menu in the Workflows listing page
- With the Publish Button inside the Workflow Builder.
Once the Workflow is published, it will run. Any Contacts who meet the trigger criteria will enter the Workflow. To edit a Published Workflow, you need to stop the Workflow.
Stopping a Workflow
When a Workflow is stopped, all enrolled Contacts will be ejected immediately. They will not be re-enrolled into the Workflow when it is re-published.
A Workflow can be stopped from two places:
- From the Actions Menu in the Workflows listing page
- With the STOP Button inside the Workflow Builder.
Once a Workflow is stopped, it may be edited.
Editing a Workflow
A workflow can only be edited when stopped.
Editing takes place in the Workflow Builder. In the Actions Menu in the Workflows listing page, click Open in Builder. Once inside the Workflow Builder, you can edit the Workflow.
Workflows Module Listing
Workflow Columns
Each Workflow will have the following associated information in its columns.
Workflow Status
The Workflow Status is used to determine if the Workflow is currently running. There are three possible statuses:
1. Draft: a Workflow that has never been published
2. Published: a Workflow that is currently implemented
3. Stopped: a previously published Workflow that has been stopped
Other Columns
Each Workflow has additional columns detailed below.
| Name | Displays the name and description |
| Last Published By | Displays the last user who published it |
| Last Published | Displays the last published date |
| Created By | Displays the user who created it |
| Date Created | Displays the date it was created |
Actions Menu
The last column in the Workflows row contains the Actions Menu. The following actions can be performed here:
| Publish Workflow | Only shown when Workflow is in Draft or Stopped |
| Stop Workflow | Only shown when Workflow is Published |
| Edit Name/Description | Allows editing of Workflow name or description |
| Open in Builder | Opens the Workflow in the Builder |
| Clone | Creates a duplicate Workflow in Draft Status |
| Delete | Deletes the Workflow |
Workflow Builder
To open the Workflow Builder, you need to create a Workflow or edit a Workflow. The Workflow Builder is a visual editor where Steps can be added, removed and configured. It consists of four main sections:
1. Top Bar
2. Assistive Tool
3. Canvas
4. Configuration Drawer
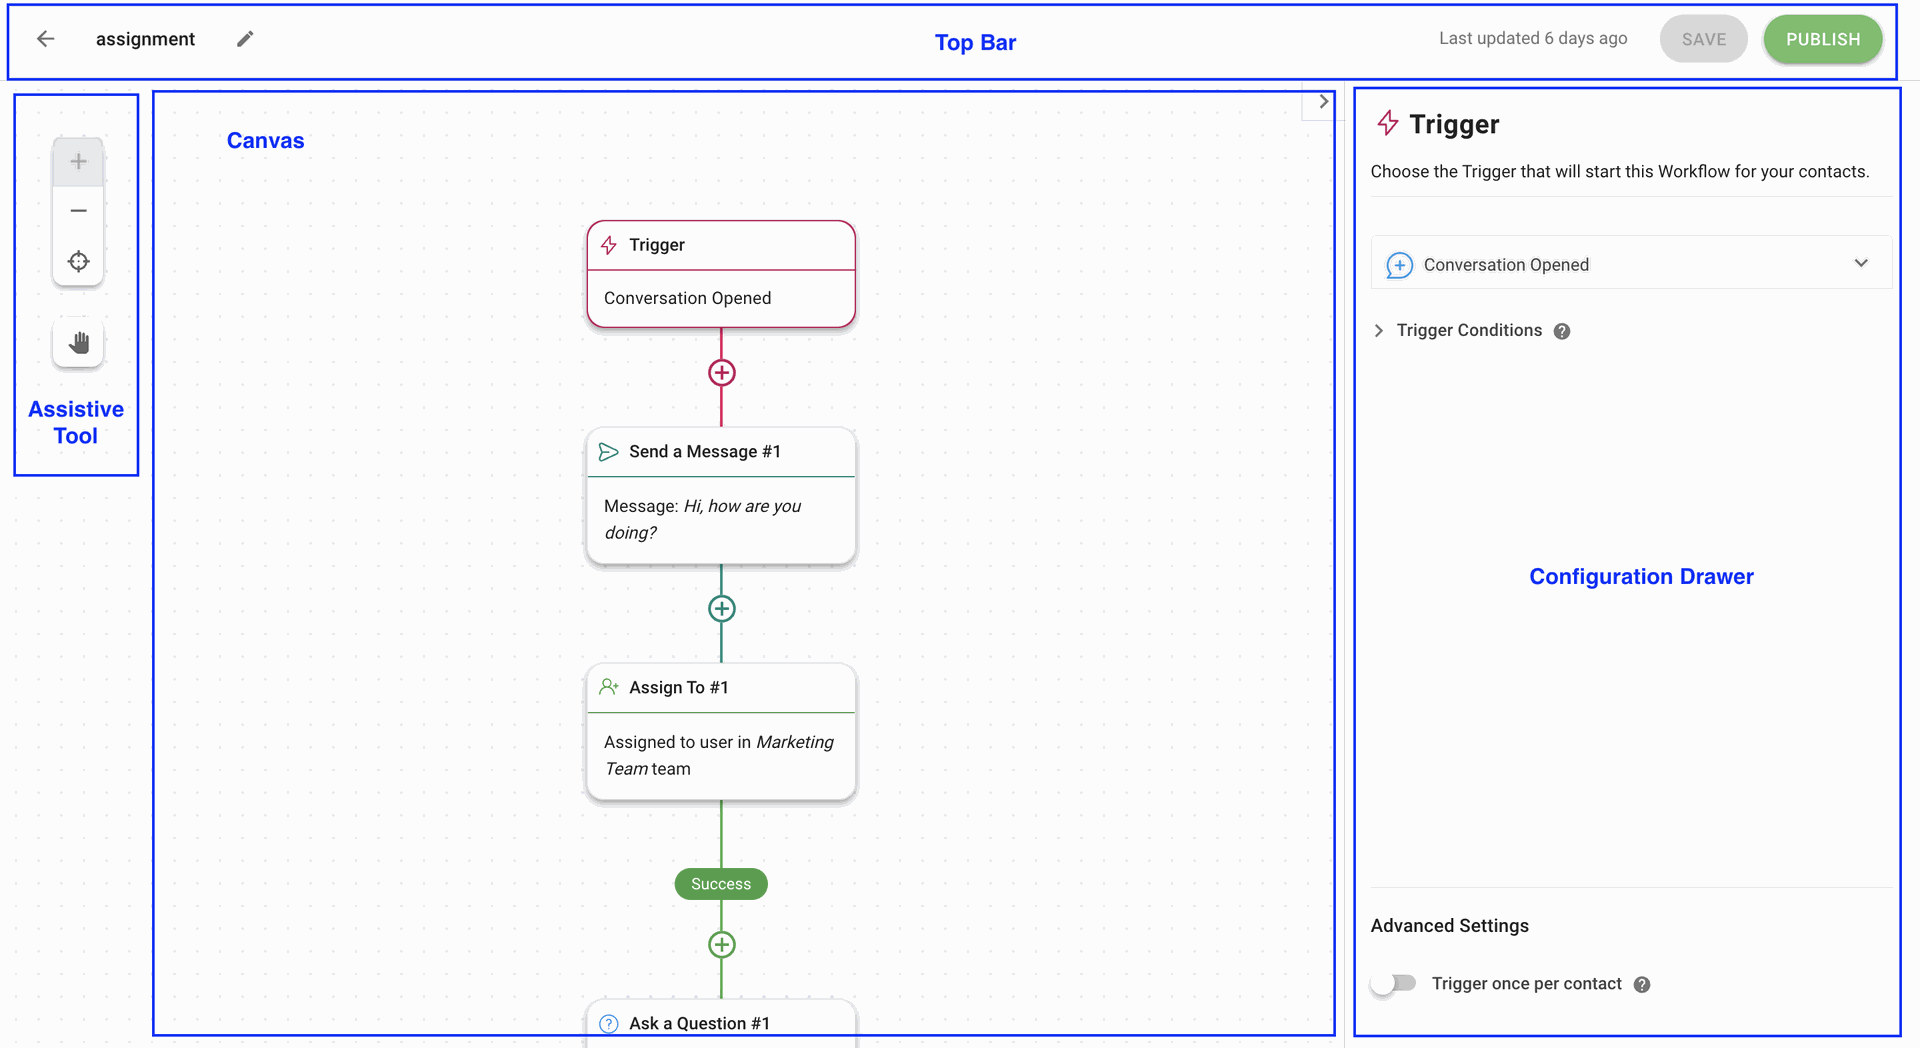
The Top Bar
The top bar is used to manage key Workflow items like its name, description, errors in step configuration and status. The elements of the top bar are as below.
| Name | Displays Name and allows editing of Name or Description |
| Error Indicator | Indicates a step configuration error |
| Save Button | Allows Workflow to be saved |
| Status Button | Allows Workflow to be published or stopped |
Assistive Tools
The Assistive Tools are designed to help you navigate the Canvas. It includes 4 tools:
1. Zoom In
2. Zoom Out
3. Back to 100% Zoom
4. Hold & Drag Canvas
Canvas
Canvas is the drag-and-drop interface that provides an overview of the Workflow. It allows the user to observe the logic and sequence of a Contact's journey during an event. Actions such as building new steps, dragging or dropping steps and connecting steps take place here.
Configuration Drawer
To configure a Trigger or Step, click on the Trigger or Step block to open its configuration drawer. The actions possible in the configuration drawer include: Edit the step name, Define the action of the trigger event or step, and Delete the step.
Frequently Asked Questions
What will happen to my Contacts if I stop a Published Workflow?
If a Workflow is stopped, all enrolled Contacts will be immediately ejected from the Workflow. They will not be re-enrolled into the Workflow if it is re-published.
Why did my Workflow end before it was completed?
A workflow may end prematurely for the following reasons:
1. The Workflow was stopped
If a Workflow is stopped, all enrolled Contacts will be immediately ejected from the Workflow.
2. The Contact fell under the Failure Branch and there was no continuing journey
Contacts may fall under a Failure Branch if they provide invalid responses or do not meet specified conditions. If there are no steps configured under the Failure Branch, the Workflow will end. It is advisable to configure steps under the Failure Branch so Contacts may continue their journey if they land here.
3. Ask a Question - Timeout
The Ask a Question Step has a default timeout period of 7 days. If Contacts do not respond within the defined or default timeout period, the Workflow will end. It is advisable to create a Timeout Branch and add Steps for Contacts to continue their journey in the event of a timeout.
4. Assign to - Timeout
The Assign To Step has a default timeout period of 7 days. If an assignee who fulfills the assignment logic cannot be found within the defined or default timeout period, the Workflow will end. It is advisable to create a Timeout Branch and add Steps for Contacts to continue their journey in the event of a timeout.
5. Branch Condition - Else
Contacts who do not meet the required conditions of a branch will fall under the Else branch. If no steps are configured under this branch, the Workflow will end. It is advisable to configure Steps under the Else branch so Contacts may continue their journey if they land here.
6. Send a Message - Fail
If a message is not sent for any reason (e.g. messaging window closed, network connection issues), the Contact will exit the Workflow.
If I manually close an ongoing Conversation with an enrolled Contact on the platform, will the Workflow end?
No, the Workflow will continue even if the Conversation is manually closed on the platform. The Workflow will only end if the Conversation closes in the Workflows Module.
Can a Contact re-enter the same Workflow they are currently enrolled in it?
A Contact cannot re-enter a Workflow they are currently enrolled in. The Contact has to exit the Workflow and meet the criteria for the trigger event again to repeat or re-enter a Workflow.
What if a Contact triggers more than one Workflow at the same time?
Both Workflows will be executed concurrently.
Why is the contact field not saving responses in the Ask a Question step?
Invalid responses, such as responses in the wrong format, cannot be saved. Clearly specify a response format when asking a question to avoid this scenario. Refer here for the correct format of each type of response.
I have updated a Contact Field value but the old value is still being applied. Why is Workflows not applying the updated value?
All Contact information will be cached or stored for three (3) minutes once the Workflow is triggered to allow for faster data access. If a Contact Field is being updated manually or programmatically while the Contact is still in a Workflow journey, the information will take up to three (3) minutes to be reflected in the Workflow. Until then, the previous value will be shown.
If I add an Ask a Question step after a Conversation has closed (e.g. Close Conversation step or Conversation Closed trigger), will the Conversation reopen if the Contact responds?
No, a Contact will not reopen the Conversation by responding to the 'Ask a Question' step.
What happens if there is no one in an Assign To team?
The Contact will not be assigned and will move on to the next step. If there is no next step, the Workflow will end.
Why is the reply from the contact not being saved in the contact field that I have selected?
It could be because the contact field chosen under the Save Response setting does not match the Question Type. Please make sure you select the correct contact field for the Question Type when saving a response. For instance, if the Question Type is a date, then the response cannot be saved as a different contact field, such as email address or phone number.